One way to learn about Asian American Pacific Islander (AAPI) Heritage Month is to do an art lesson and project together as a family, group of friends, class or scout group. Here we learn about tapa cloths, an important part of Pacific Islander culture, and how to make them out of brown paper bags. There is lots of room for creativity, so have fun with this art project!
What is Tapa Cloth?
Tapa cloth, typically made from the inner bark of a mulberry or fig tree, are found throughout the Pacific Islands (Hawaii, Fiji, Papua New Guinea, Samoa and more). Used for both functional and ceremonial purposes, tapa cloth is decorated with organic and geometric shapes using natural dyes made from plants. It can be painted or stamped. For large tapa cloths, artists often use a stencil under the cloth and dab ink over the template, sort of like a crayon rubbing. Tapa cloth is often made for special occasions such as weddings, given as gifts to special guests, or used as decoration. While “tapa” is the universally known term, it has different names on different islands:
- Samoa — siapo
- Hawaii — kapa
- Fiji — masi
SUPPLIES
Brown paper grocery bag
Scissors
Iron
Ruler
Pencil
Eraser
Permanent marker
Tempera or acrylic paint in earth tones or bright colors
Paintbrush
Water cup
Paper plate
Paper towels
DIRECTIONS
- Cut open a brown paper bag at the seam; Cut off the entire bottom of the bag so you have one large rectangle.
- Crumple the paper into a ball, then open and smooth it out with your hands. Do this several times. It helps to add a bit of water to the paper, to soften it and make it easier to crumple. This process makes the paper look more like cloth. If you do dampen the paper, allow it to dry thoroughly before moving to the next step.
- Iron bag to smooth out (iron it whether you add water in the previous step or not). Cut into a standard paper size such as 8½” x 11” or 9” x 12”.
- Create your design.
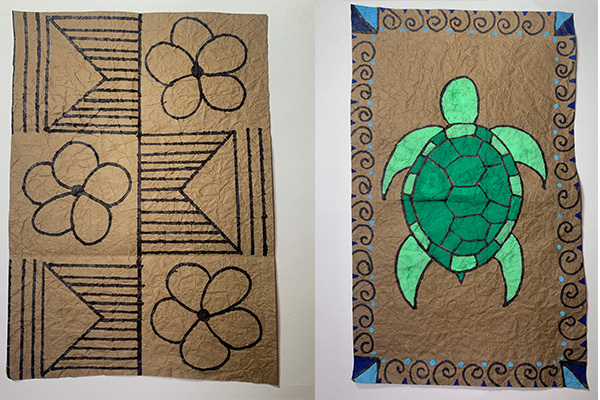
- For a geometric-looking tapa cloth: Using a pencil and ruler, divide the paper into six sections. Draw simple patterns using squares, triangles, circles or shapes of your choice in each square. You can also add simple lines if you’d like.
- For one large picture: Draw an image in the middle of your paper such as a fish, shark, or turtle and add a decorative pattern around the edge.
- Go over the pencil lines with permanent marker.
- If you want your tapa cloth to be colorful, paint as desired. Traditional tapa or siapo cloth uses earth tones such as red, brown and yellow ochre.
Learn more about tapa cloths from Bowers Museum in Santa Ana, CA.
Alyssa Navapanich is a nationally recognized art educator who teaches art to elementary school kids in East San Diego County. She is the contributor to San Diego Family Magazine’s award-winning column, “Art with Alyssa.”
_____________


