Turkeys 1684

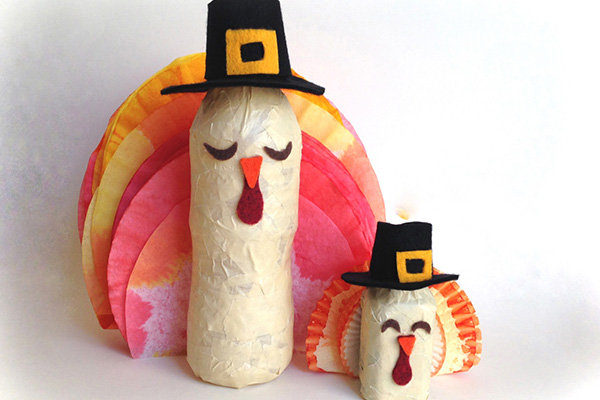
Decorate the Thanksgiving table or mantle with cute turkeys made from water bottles and simple household items. Fun Thanksgiving craft for kids!

Supplies:
Package of coffee filters
Plastic water bottle (12-16 oz., full)
Masking tape/paper tape
Red and yellow liquid food coloring
Scraps of black and colored felt
Double-sided tape or low-temp hot glue
Scissors
3 glass bowls or disposable plastic containers
Metal or plastic spoon
Newspapers

Directions:

1. First, make sure to completely cover the work area with thick newspaper or plastic to avoid stains from the food coloring.
2. Next, add about a half a cup of water to each of the three bowls.
3. Squirt some red food coloring into one bowl, yellow into another and both into the third to make orange and stir each with a spoon.
4. Separate about half a package of coffee filters into several small stacks. Use scissors to trim the edges of some of the stacks to make slightly smaller circles.
5. One at a time, fold each stack in half and dip the tips into one of the liquid colors.
6. Refold and then dip the new tips into the same or different colors to create monochromatic or multi-colored edges on each of the stacks of filters.
7. Set the wet stacks of dyed filters on newspaper in a warm place to dry.
8. Then, use short torn strips of masking tape to completely cover the water bottle. (Leave the water bottle full for the weight.)
9. Use scissors to create features and a little pilgrim hat from felt, then use double-sided tape or hot glue (an adult’s job) to adhere them to the bottle.
10. Make sure all of the dyed coffee filters are completely dry
before stacking them in a nice arrangement to create a big turkey tail. Place the smaller circles at the front and back of the stack.
11. Fold the bottom edge under an inch or two, so the thick stack of filters is flat along the bottom.
12. Then, patiently tape or glue every coffee filter together at the bottom and up the center so they stick together when the stack is held upright.
13. Next, use lots of tape or glue to attach the big tail to the back of the turkey body/bottle.
14. Gently fan apart the filters a little to make the tail fuller, applying more glue or tape when needed- then the big turkey is ready to use as a cute Thanksgiving centerpiece!

If desired, use smaller water bottles or old spice jars to make matching little turkey place markers for each seat at the table.

More tips and ideas:

•    Try using patterned Washi tapes instead of masking tape.
•    Cover the bottle with glitter, twine or small, torn pieces of old books pages for a different look.
•    Instead of felt use paper or craft foam to make the hat and face.
•    If food coloring isn’t handy, thin down craft paint with water.
•    Add felt feet and wings to the turkey.
•    Use googly eyes or candy eyes instead of felt ones.
•    Cut paper feathers to stick into the tail and dinner guests can write what they are thankful for on them.
•    Add names on small strips or flags of paper to the smaller turkeys to turn them into place cards.

----------

Pamela Maxwell is an artist, author and mother of two growing boys. Her craft and scrapbooking projects have appeared in numerous books and magazines. Photos by Pamela Maxwell.

Published: October 2014

Art with Alyssa: How to Make a Leprechaun Trap

Art with Alyssa: How to Make a Leprechaun Trap

Have fun this St. Patrick’s Day making leprechaun traps with the kids. Start by reading a related story, such as How to Catch a Leprechaun by Adam Wallace, for inspiration. Then use your imaginati . . .

Read more

Lucky Leprechauns

Lucky Leprechauns

This St. Patrick’s Day create some cute leprechauns from plastic eggs and craft scraps.SuppliesGreen plastic Easter eggsScraps of craft foam, felt or paperSmall, miscellaneous craft items (ribbon, . . .

Read more

Art with Alyssa: Shamrock Watercolor Banner

Art with Alyssa: Shamrock Watercolor Banner

Here’s a St. Patrick’s Day art project the whole family can get excited about! Make beautiful watercolor designs and cut them into shamrock shapes to make a decorative banner or cards for loved . . .

Read more

Swirly Shamrocks

Swirly Shamrocks

Craft this cute shamrock for St. Paddy’s Day with green paper, glue and a little glitter. You'll Need:4 sheets of 8 1/2 x 11 green cardstock or construction paperPencilRulerScissorsWhite glueTr . . .

Read more

Art with Alyssa: How to Make a Nature Journal

Art with Alyssa: How to Make a Nature Journal

Creating and maintaining a nature journal is a fun, relaxing and educational activity for children (and adults) that encourages time outdoors and connection with nature. There is no right way to kee . . .

Read more

Art with Alyssa: Nature's Paintbrushes

Art with Alyssa: Nature's Paintbrushes

Create beautiful outdoor art using homemade paintbrushes from plants and items found in nature.Tips for Teachers/ParentsTeach children to respect living plants and only use found or discarded flower . . .

Read more

Art with Alyssa: Nature Weaving

Art with Alyssa: Nature Weaving

Supplies Twigs or sticks, 6–12” long Garden clippers Scissors Twine or yarn Variety of grasses, flowers and plants with long stems. (I used buttercup, euryops, geranium, lavender, rosemar . . .

Read more

Art with Alyssa: Recycled Egg Carton Flowers

Art with Alyssa: Recycled Egg Carton Flowers

Turning trash into treasure is not only fun, it’s great for the planet. You’ll love this recycled art project that transforms a paper egg carton into a beautiful bouquet of flowers—perfect for . . .

Read more

Art with Alyssa: Marble Painting

Art with Alyssa: Marble Painting

  Marble painting is a great art project that encourages eye-hand coordination and muscle control. It’s fun to experiment with different colors and designs and it’s easy to adapt the project . . .

Read more

Raindrop Drip Painting

Raindrop Drip Painting

We don’t know many kids who can resist jumping in rain puddles. And since we don’t get rain puddles too often in San Diego, it’s a particularly unique and special activity! Why not commemorate . . .

Read more

Art with Alyssa: Recycled Easter “Eggs”

Art with Alyssa: Recycled Easter “Eggs”

Combining Easter fun and environmental awareness in honor of Earth Day is a win-win in our eyes. Here are instructions to make DIY Easter “eggs”— a fun and clever way to wrap and hide treats f . . .

Read more

Art with Alyssa: DIY Easter Treat Baskets

Art with Alyssa: DIY Easter Treat Baskets

Make miniature baskets using simple materials like paper plates, pipe cleaners and markers; then deliver springtime treats to neighbors and friends! Supplies Paper plates, one per basket Marker . . .

Read more

Easter Egg Decor

Easter Egg Decor

Decorate real eggs this Easter to look like sweet treats such as cupcakes, lollipops and wrapped candies. SuppliesEggsEgg decorating kit/dye of choiceSmall pieces of colored and clear cellophaneBake . . .

Read more

Spring Bunny Cup

Spring Bunny Cup

This spring, craft a cute bunny cup to hold Easter treats! You'll Need:Paper cupScraps of pretty paper12” length of crepe paper streamerChenille stemGlitter3 buttons3 pom-pomsWhite gluePencilMark . . .

Read more

Be Family Informed – Sign up for our Newsletters below!

Subscribe